# 一.nacos
# 1.nacos 安装
# 1.下载
https://github.com/alibaba/nacos/releases

# 2.上传文件
上传到/opt 目录,并进行解压
#服务器
cd /opt/nacos
#mac机器
cd /Users/qinyingjie/Documents/software/nacos/bin
2
3
4
# 3.启动和关闭
#单机启动
sh startup.sh -m standalone

#关闭
sh shutdown.sh
2
3
4
5
# 4.查看
https://qinyingjie.top:8848/nacos/
用户名和密码都是:nacos
2
jps

# 2.nacos 控制台
# 1.访问链接
# 2.模块
- 配置管理
- 服务管理
- 命名空间
- 集群管理

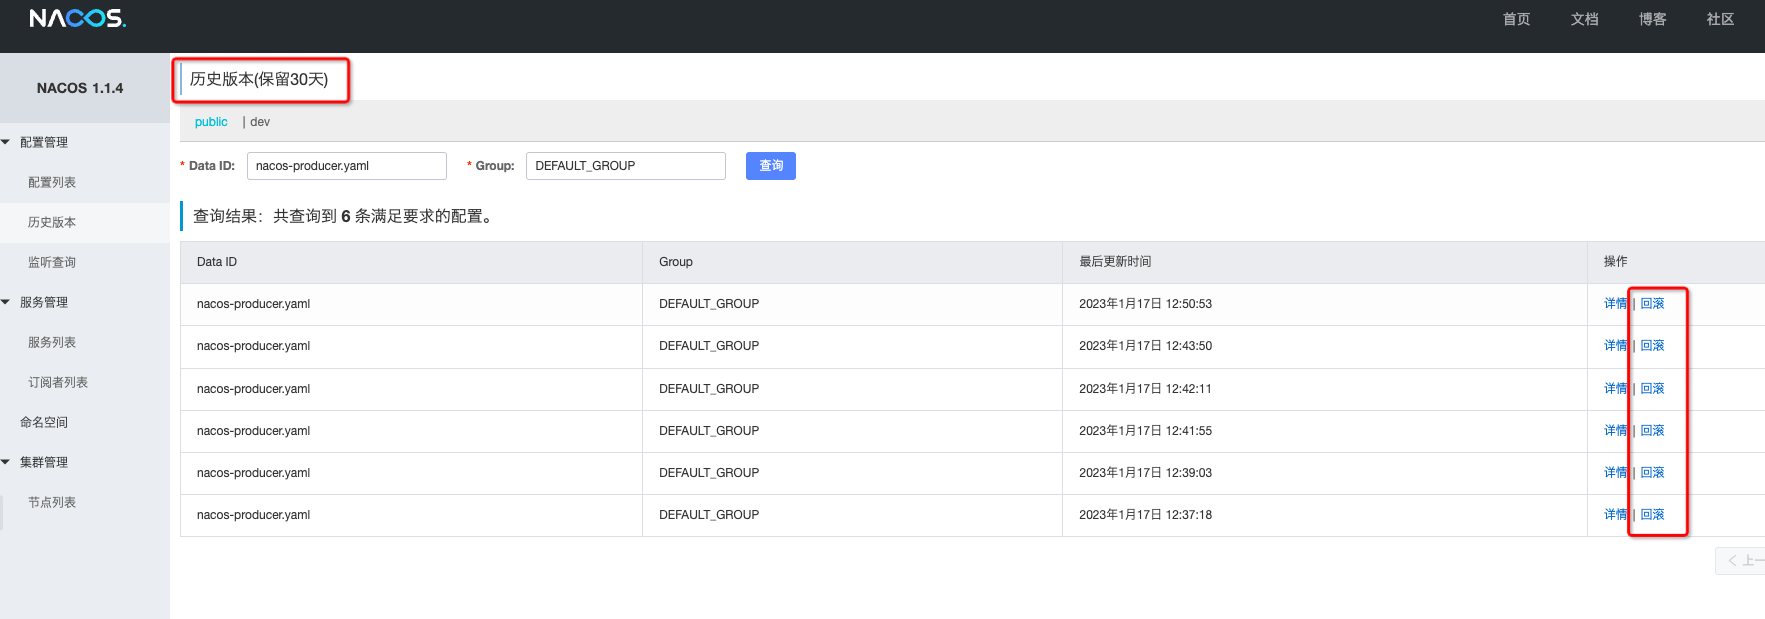
# 3.回滚
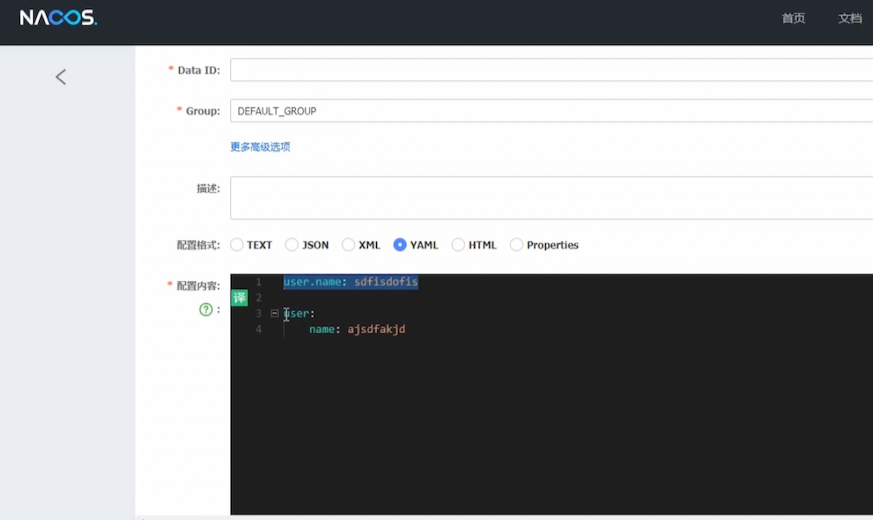
# 4.yaml 支持
支持 2 种写法,都是 ok 的
# 二.Sentinel
# 1.地址
源码地址:https://github.com/alibaba/Sentinel 官方文档:https://github.com/alibaba/Sentinel/wiki
Sentinel 社区官方网站:https://sentinelguard.io/zh-cn/
控制台:https://github.com/alibaba/Sentinel/releases
# 2.启动控制台
Sentinel Dashboard 是一个独立的项目,sentinel-dashboard-1.8.6.jar,需要使用 java -jar 运行
#进入sentinel的目录
cd /kwan/software

#启动sentinel的控制台
nohup java -jar sentinel-dashboard-1.8.6.jar --server.port=8181 >sentinel-dashboard.log 2>&1 &
2
3
4
5
# 3.访问控制台
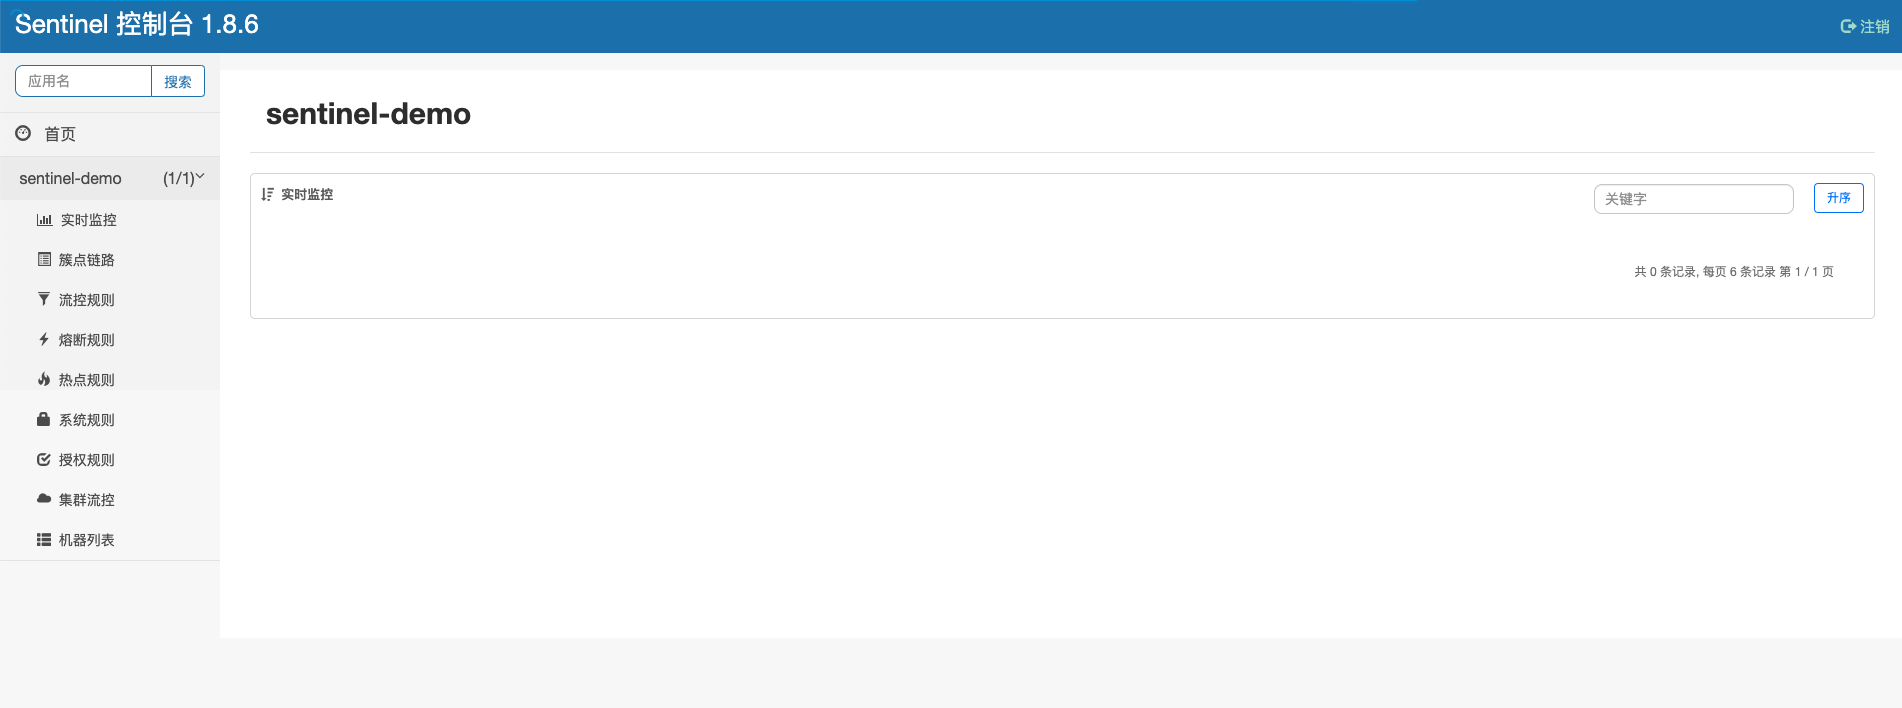
默认情况下 Sentinel 会在客户端首次调用的时候进行初始化,开始向控制台发送心跳包。也可以配置
sentinel.eager=true ,取消 Sentinel 控制台懒加载。打开浏览器即可展示 Sentinel 的管理控制台
#控制台
https://qinyingjie.top:8181/#/login

#账号密码
sentinel
sentinel
2
3
4
5
6
#端口号
server:
  port: 18088

#spring配置
spring:
  application:
    name: sentinel-demo
  profiles:
    active: dev
  cloud:
    nacos:
      discovery:
        server-addr: https://qinyingjie.top:8848 #服务注册地址
      config:
        server-addr: https://qinyingjie.top:8848 #配置中心地址
        file-extension: yaml #文件类型
        group: DEV_GROUP #组别
        namespace: e750dcd5-657b-489b-8d15-b7b71aa3e984 #命名空间
        refresh-enabled: true #默认自动刷新
    sentinel:
      transport:
        dashboard: 43.139.90.182:8181
2
3
4
5
6
7
8
9
10
11
12
13
14
15
16
17
18
19
20
21
22
23
# 4.pom
<dependency>
    <groupId>com.alibaba.csp</groupId>
    <artifactId>sentinel-core</artifactId>
</dependency>
<dependency>
    <groupId>com.alibaba.csp</groupId>
    <artifactId>sentinel-transport-simple-http</artifactId>
</dependency>
<!--sentinel启动器-->
<dependency>
    <groupId>com.alibaba.cloud</groupId>
    <artifactId>spring-cloud-starter-alibaba-sentinel</artifactId>
</dependency>
2
3
4
5
6
7
8
9
10
11
12
13
# 5.代码实现 sentinel
public static void main(String[] args) {
  while (true) {
      Entry entry = null;
      try {
          entry = SphU.entry("HelloWorld");
          /*您的业务逻辑 - 开始*/
          System.out.println("hello world");
          /*您的业务逻辑 - 结束*/
      } catch (BlockException e1) {
          /*流控逻辑处理 - 开始*/
          System.out.println("block!");
          /*流控逻辑处理 - 结束*/
      } finally {
          if (entry != null) {
              entry.exit();
          }
      }
  }
}
2
3
4
5
6
7
8
9
10
11
12
13
14
15
16
17
18
19
# 6.节点说明
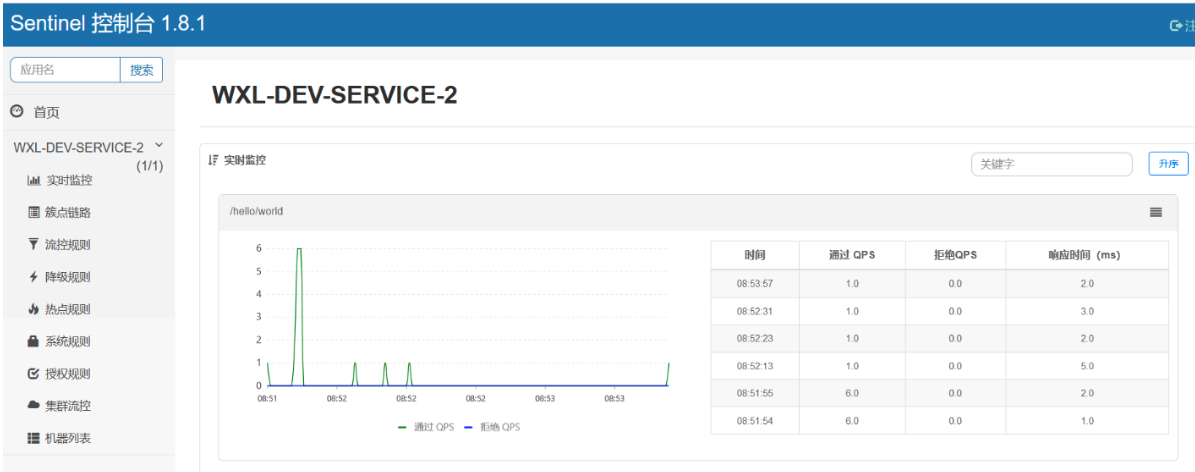
# 1.实时监控
实时监控,可用于查看接口访问情况
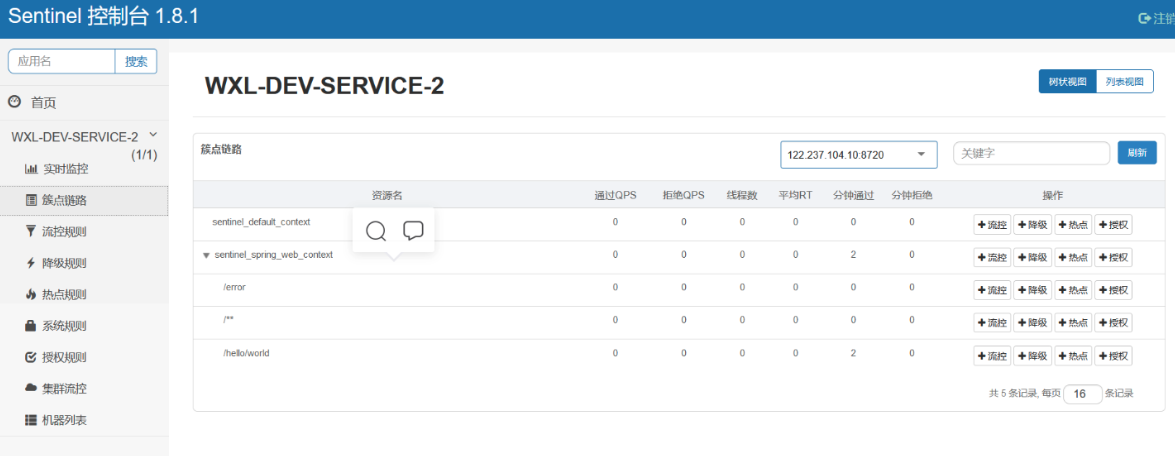
# 2.簇点链路
簇点链路,可以对对应的资源流控降级
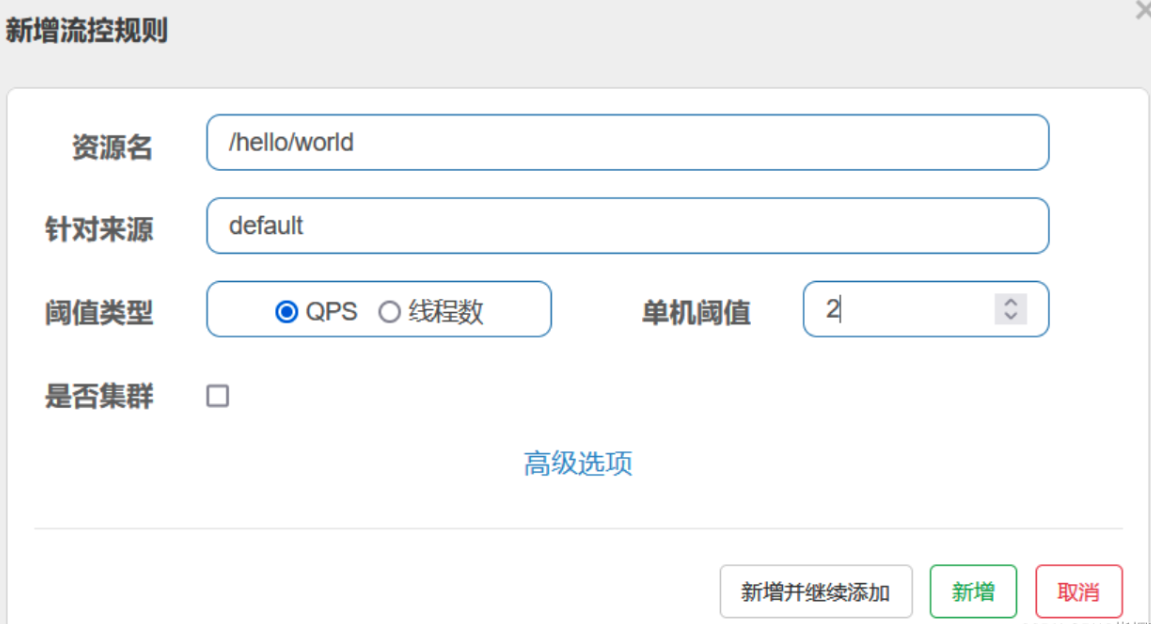
# 3.流控规则
- QPS
- 线程数
自定义规则
/**
 * http://localhost:18088/sentinel/world
 *
 * @return
 */
@GetMapping("/world")
@SentinelResource(value = "helloWorld", blockHandler = "helloBlock")
public String helloWorld() {
    return "Hello world";
}

public String helloBlock(BlockException e) {
    return "你已被流控";
}
2
3
4
5
6
7
8
9
10
11
12
13
14
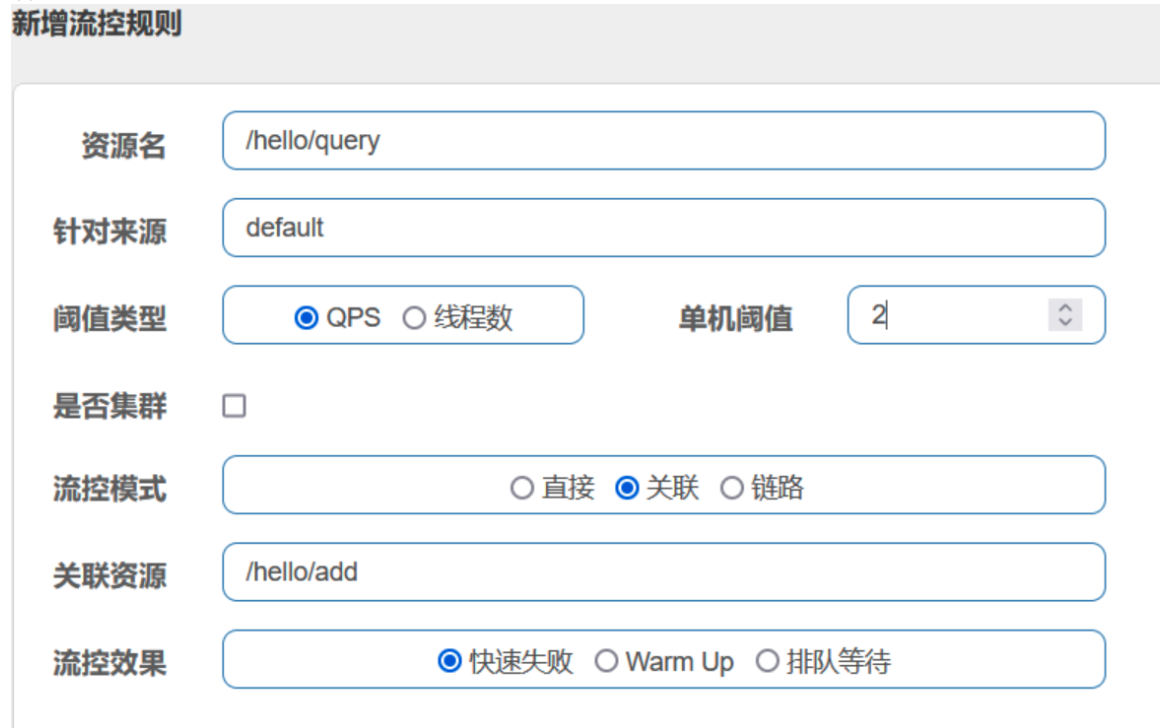
关联限流
这里的意思是如果/hello/add 接口一秒钟之内访问超过 2 次,则/hello/query 会被限流。
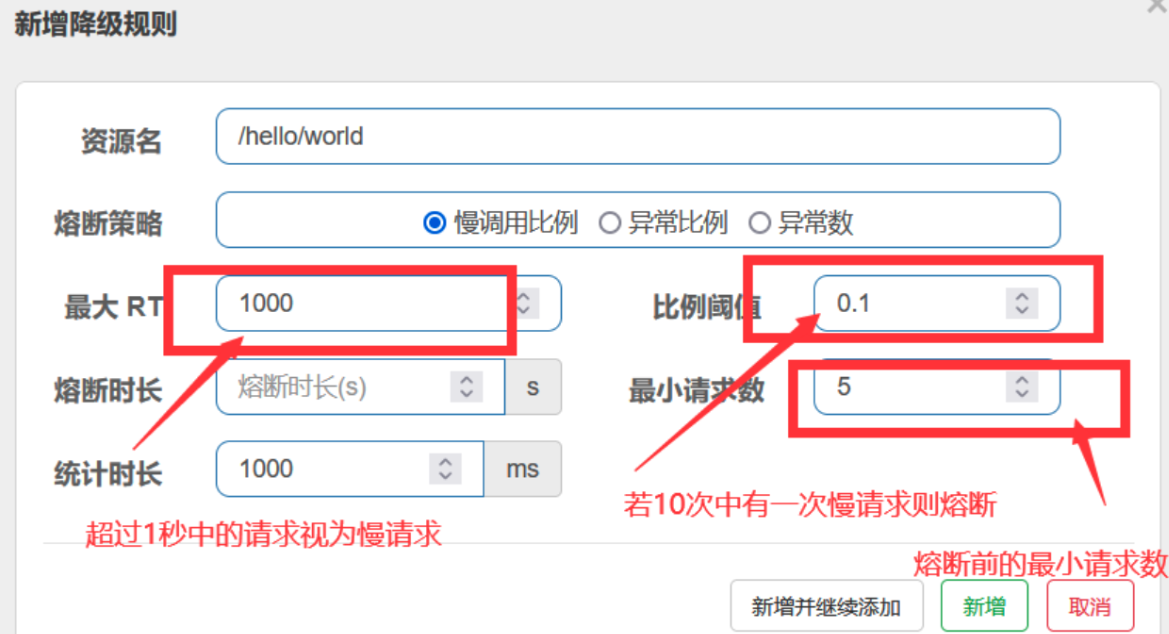
# 4.熔断规则
也要设置熔断时长,熔断时长过完之后会进入半开状态,即若下一次请求为慢请求则再次熔断,直到第一次请求不是慢请求才会恢复正常状态。
# 7.sentinel 持久化
# 1.bootstrap 配置
bootstrap.yml
#端口号
server:
  port: 8086

#spring配置
spring:
  application:
    name: nacos-server-sentinel-consumer
  profiles:
    active: dev
  cloud:
    nacos:
      discovery:
        server-addr: localhost:8848 #服务注册地址
      config:
        server-addr: localhost:8848 #配置中心地址
        file-extension: yaml #文件类型
        group: DEV_GROUP #组别
        namespace: 4cd9bd32-8f25-45cd-b919-df1a0df146e0 #命名空间
        refresh-enabled: true #默认自动刷新
    sentinel:
      transport:
        dashboard: 127.0.0.1:8181
        port: 8719 #默认端口,如果被占用则从8719依次+1扫描
      datasource:
        ds1:
          nacos:
            server-addr: localhost:8848
            username: nacos
            password: nacos
            dataId: nacos-server-sentinel-consumer # 微服务名称
            groupId: DEFAULT_GROUP
            data-type: json
            rule-type: flow # 流控规则
2
3
4
5
6
7
8
9
10
11
12
13
14
15
16
17
18
19
20
21
22
23
24
25
26
27
28
29
30
31
32
33
34
# 2.pom
<dependency>
    <groupId>com.alibaba.csp</groupId>
    <artifactId>sentinel-datasource-nacos</artifactId>
</dependency>
2
3
4
# 3.nacos 配置
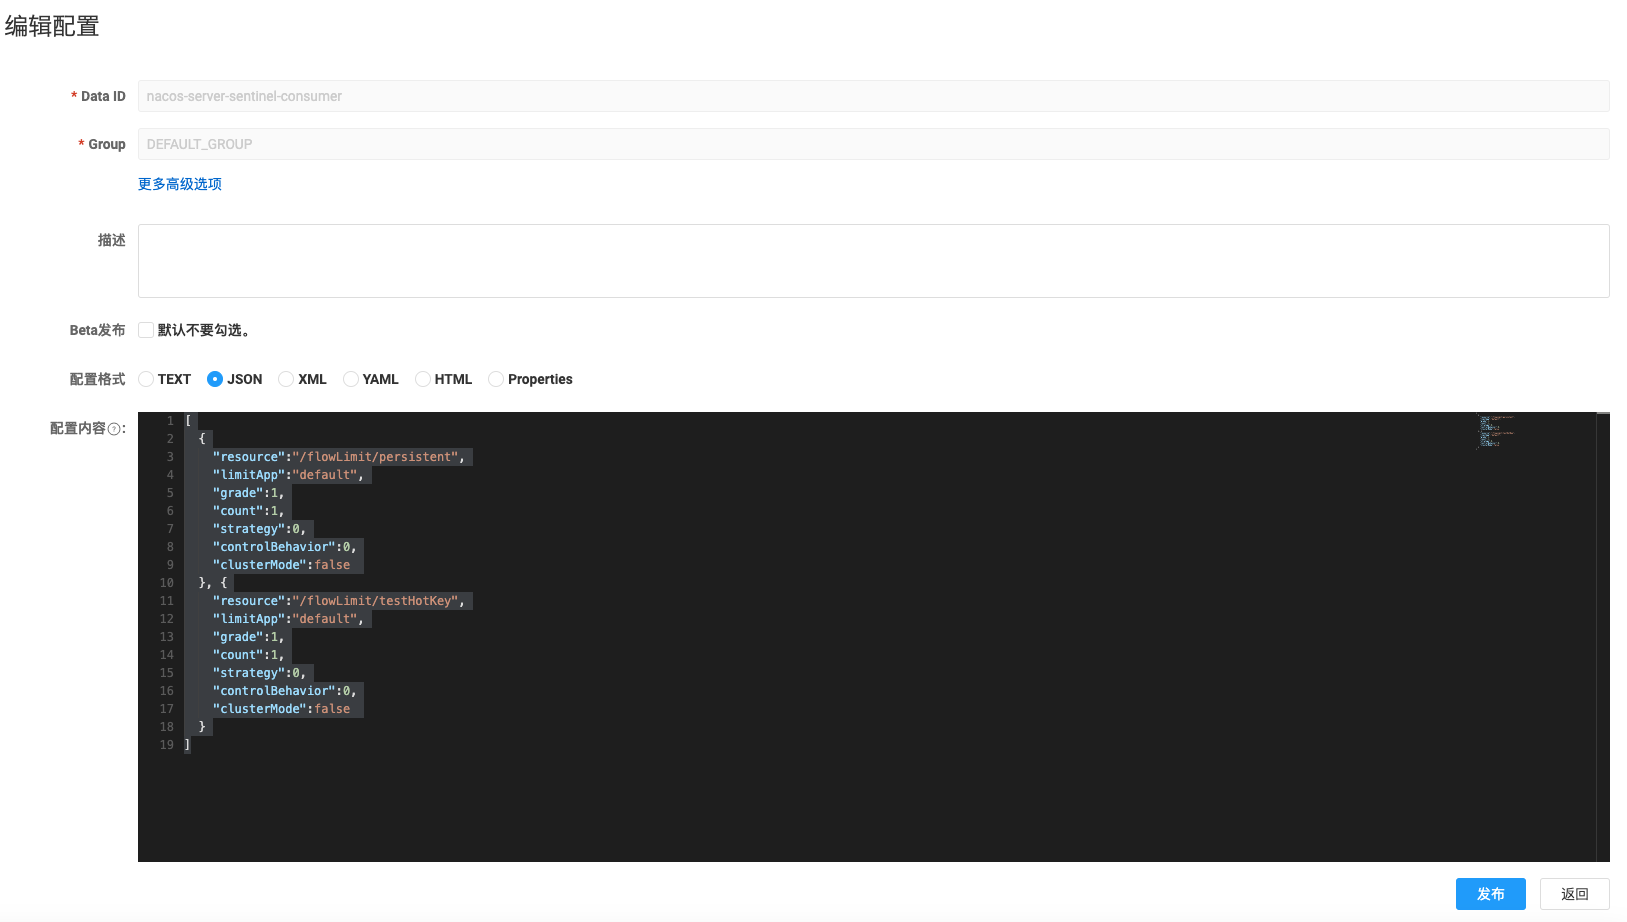
配合 nacos 进行使用,需要进行双向绑定
[
  {
    "resource": "/flowLimit/persistent",
    "limitApp": "default",
    "grade": 1,
    "count": 1,
    "strategy": 0,
    "controlBehavior": 0,
    "clusterMode": false
  },
  {
    "resource": "/flowLimit/testHotKey",
    "limitApp": "default",
    "grade": 1,
    "count": 1,
    "strategy": 0,
    "controlBehavior": 0,
    "clusterMode": false
  }
]
2
3
4
5
6
7
8
9
10
11
12
13
14
15
16
17
18
19
20
# 8.sentinel 常见问题
# 1.控制台修改未同步
push 模式的数据源(如配置中心)都是只读的。对于配置中心类型的数据源(如 ZooKeeper),我们推荐在推送规则时直接推送至配置中心,然后配置中心再自动推送至所有的客户端(即 Dashboard -> Config Center -> Sentinel DataSource -> Sentinel),目前需要自行改造控制台。
对于 pull 模式的数据源(如本地文件),则可以向 transport-common 模块的 WritableDataSourceRegistry 注册写入数据源,在推送规则时会一并推送至本地数据源中。
# 2.异常处理方式
有以下几种情况:
- 默认资源被流控降级后会抛出
BlockException异常的子类(比如限流会抛FlowException异常,降级会抛出降级异常DegradeException)。您可以通过以下方法判断是否为流控降级异常:BlockException.isBlockException(Throwable t)。 - 对于 Sentinel 注解模式 (opens new window),可以在
@SentinelResource注解上配置blockHandler函数(注意对应函数的签名需要符合要求),在被限流降级的时候进行相应的处理。 - 对于 Dubbo 服务,我们支持注册全局的 fallback 函数。
- Web Servlet Filter:默认情况下,当请求被限流时会返回默认的提示页面,提示信息为:
Blocked by Sentinel (flow limiting)。您也可以通过WebServletConfig.setBlockPage(blockPage)方法设定自定义的跳转 URL,当请求被限流时会自动跳转至设定好的 URL。同样也可以实现UrlBlockHandler接口并编写定制化的限流处理逻辑,然后将其注册至WebCallbackManager中。
# 3.入口资源和出口资源
入口资源和出口资源是什么意思?EntryType.IN 有什么作用?
A: 入口流量指的是进入应用的流量(EntryType.IN),通常作为 provider。比如 Web 服务或 Dubbo 服务端接收的请求,都属于入口流量。而出口流量指的是从本资源调其它资源的流量(EntryType.OUT),通常作为 consumer。
部分规则的判断会区分流量类型,比如系统规则只对入口流量生效。
# 4.强制熔断
Sentinel 熔断降级有没有类似于 Hystrix 的强制熔断(forceOpen)的功能?
可以直接针对该资源配置一条 QPS=0 的流控规则即可达到该效果。
# 5.同个资源多条规则?
Sentinel 中同个资源名 (resource) 支持配置多种、多条规则,多条规则会并列生效。从实际触发效果来说,一般是阈值紧的优先生效。
# 三.gateway
# 1.网关服务配置
# 1.pom
<dependencies>
    <dependency>
        <groupId>org.springframework.boot</groupId>
        <artifactId>spring-boot-starter-actuator</artifactId>
    </dependency>
    <dependency>
        <groupId>com.alibaba.cloud</groupId>
        <artifactId>spring-cloud-starter-alibaba-nacos-discovery</artifactId>
    </dependency>
    <dependency>
        <groupId>org.springframework.cloud</groupId>
        <artifactId>spring-cloud-starter-gateway</artifactId>
        <version>2.1.5.RELEASE</version>
    </dependency>
    <dependency>
        <groupId>com.alibaba.cloud</groupId>
        <artifactId>spring-cloud-starter-alibaba-sentinel</artifactId>
    </dependency>
    <dependency>
        <groupId>org.projectlombok</groupId>
        <artifactId>lombok</artifactId>
        <optional>true</optional>
    </dependency>
    <dependency>
        <groupId>org.springframework.boot</groupId>
        <artifactId>spring-boot-starter-test</artifactId>
        <scope>test</scope>
    </dependency>
</dependencies>
2
3
4
5
6
7
8
9
10
11
12
13
14
15
16
17
18
19
20
21
22
23
24
25
26
27
28
29
# 2. bootstrap.yml
#端口号
server:
  port: 8089

management:
  endpoint:
    health:
      show-details: always
  endpoints:
    jmx:
      exposure:
        include: "*"
    web:
      exposure:
        include: "*"
  health:
    sentinel:
      enabled: false

#spring配置
spring:
  application:
    name: nacos-server-gateway
  profiles:
    active: dev
  cloud:
    gateway:
      enabled: true #开启网关
      discovery:
        locator:
          enabled: true #启用DiscoveryClient
      routes:
        - id: route1
          uri: lb://nacos-server-consumer
          predicates:
            - Path=/nacos/consumer/test,/nacos/consumer/index
        - id: route2
          uri: lb://nacos-server-producer
          predicates:
            - Path=/service/**
          filter:
            - AddRequestHeader=X-Request-Id,12345

    nacos:
      discovery:
        server-addr: https://qinyingjie.top:8848 #服务注册地址
        username: nacos
        password: nacos
    sentinel:
      transport:
        dashboard: 127.0.0.1:8181
        port: 8719 #默认端口,如果被占用则从8719依次+1扫描
2
3
4
5
6
7
8
9
10
11
12
13
14
15
16
17
18
19
20
21
22
23
24
25
26
27
28
29
30
31
32
33
34
35
36
37
38
39
40
41
42
43
44
45
46
47
48
49
50
51
52
# 3.主类
@EnableDiscoveryClient
@SpringBootApplication
public class GatewayApplication {
    public static void main(String[] args) {
        SpringApplication.run(GatewayApplication.class, args);
        System.out.println("-------网关服务启动成功------");
    }
}
2
3
4
5
6
7
8
# 2.消费端配置
# 1. bootstrap.yml
#端口号
server:
  port: 8085

#spring配置
spring:
  application:
    name: nacos-server-consumer
  profiles:
    active: dev
  cloud:
    nacos:
      discovery:
        server-addr: https://qinyingjie.top:8848 #服务注册地址
      config:
        server-addr: https://qinyingjie.top:8848 #配置中心地址
        file-extension: yaml #文件类型
        group: DEV_GROUP #组别
        namespace: 4cd9bd32-8f25-45cd-b919-df1a0df146e0 #命名空间
        refresh-enabled: true #默认自动刷新
2
3
4
5
6
7
8
9
10
11
12
13
14
15
16
17
18
19
20
# 2.controller
/**
 * 获取配置的变量
 * <p>
 * http://127.0.0.1:8085/nacos/consumer/nameInfo
 */
@GetMapping(value = "/nameInfo", produces = MediaType.APPLICATION_PROBLEM_JSON_VALUE)
public Result nameInfo() {
    return Result.ok();
}

/**
 * http://127.0.0.1:8085/nacos/consumer/test
 */
@GetMapping(value = "/test", produces = MediaType.APPLICATION_PROBLEM_JSON_VALUE)
public Result test() {
    return Result.ok();
}

/**
 * 获取配置的变量
 */
@GetMapping(value = "/index", produces = MediaType.APPLICATION_PROBLEM_JSON_VALUE)
public Result index() {
    return Result.ok();
}
2
3
4
5
6
7
8
9
10
11
12
13
14
15
16
17
18
19
20
21
22
23
24
25
# 3.访问
http://127.0.0.1:8089/nacos/consumer/index 可以访问
因为在网关服务配置了-Path 信息
# 4.依赖
在使用 gateway 网关的时候,不能引入 spring-boot-starter-web,否则会报错,因为内置服务器为 netty 服务器
<!--此jar在网关服务中,是不需要配置的,若引入了,则会引发启动-->
<dependency>
  <groupId>org.springframework.boot</groupId>
  <artifactId>spring-boot-starter-web</artifactId>
</dependency>
2
3
4
5
# 5.配置文件方式
通过配置文件的方式跳转到淘宝
@Configuration
public class GatewayConfig {
    /**
     * 访问外网淘宝网
     *
     * @param builder
     * @return
     */
    @Bean
    public RouteLocator customRouteLocator(RouteLocatorBuilder builder) {
        return builder.routes()
                .route("gateway_baidu", r -> r.path("/gateway/toTaobao")
                        .uri("http://www.taobao.com"))
                .build();//id,访问配置path,以及真正访问地址
    }
}
2
3
4
5
6
7
8
9
10
11
12
13
14
15
16
# 6.十一种谓词
routes:
  - id: route1
    uri: lb://nacos-server-consumer
    predicates:
      - Path=/nacos/consumer/test,/nacos/consumer/index
        # - After=2023-02-17T23:26:22.403+08:00[Asia/Shanghai]
        # - Before=2023-02-17T23:26:22.403+08:00[Asia/Shanghai]
        # - Between=2023-02-17T23:26:22.403+08:00[Asia/Shanghai],2023-03-30T16:00:22.432+08:00[Asia/shanghai]
        # - Between=2023-03-17T23:26:22.403+08:00[Asia/Shanghai],2023-03-30T16:00:22.432+08:00[Asia/shanghai]
        # - Cookie=username,Lisi
        # - Cookie=username,\d+
        # - Header=id,001
      #   - Header=id,\d+
      #   - Host=**.somehost.org,**.anotherhost.org
      #   - Method=GET,POST
      #- Query=number,abc
      - RemoteAddr=192.168.1.1/24
2
3
4
5
6
7
8
9
10
11
12
13
14
15
16
17
- id: weight_high
  uri: https://weighthigh.org
  predicates:
    - Weight=group1, 8
- id: weight_low
  uri: https://weightlow.org
  predicates:
    - Weight=group1, 2
2
3
4
5
6
7
8
请求方式
#添加cookie
curl http://localhost:8089/nacos/consumer/index --cookie "username=Lisi"

#添加header
curl http://localhost:8089/nacos/consumer/index -H "id:001"

#添加host
curl http://localhost:8089/nacos/consumer/index -H "host:a.somehost.org"

#添加指定参数
http://localhost:8089/nacos/consumer/index?number=abc
2
3
4
5
6
7
8
9
10
11
# 四.skywalking
# 1.启动服务
在 startup.sh 文件中,可以同时启动 webappService 和 oapService
#启动服务端和控制台
/Users/qinyingjie/Documents/software/skywalking/apache-skywalking-apm-bin/bin/startup.sh

#访问控制台
http://127.0.0.1:8080/
2
3
4
5
webappService.sh 对应 web 端的启动
oapService.sh 对应的是 oap 收集器的启动
# 2.在 idea 中使用

# 3.配置说明
# 1.jvm 参数添加
指定 agent 代理包的 jar 包地址
-javaagent:/Users/qinyingjie/Documents/software/skywalking/skywalking-agent/skywalking-agent.jar
# 2.添加环境参数
SW_AGENT_COLLECTOR_BACKEND_SERVICES=127.0.0.1:11800;SW_AGENT_NAME=nacos-server-consumer

SW_AGENT_COLLECTOR_BACKEND_SERVICES=127.0.0.1:11800;SW_AGENT_NAME=nacos-server-producer
2
3
- SW_AGENT_COLLECTOR_BACKEND_SERVICES:收集器的地址
- SW_AGENT_NAME:被监控的微服务的名称
# 4.控制台
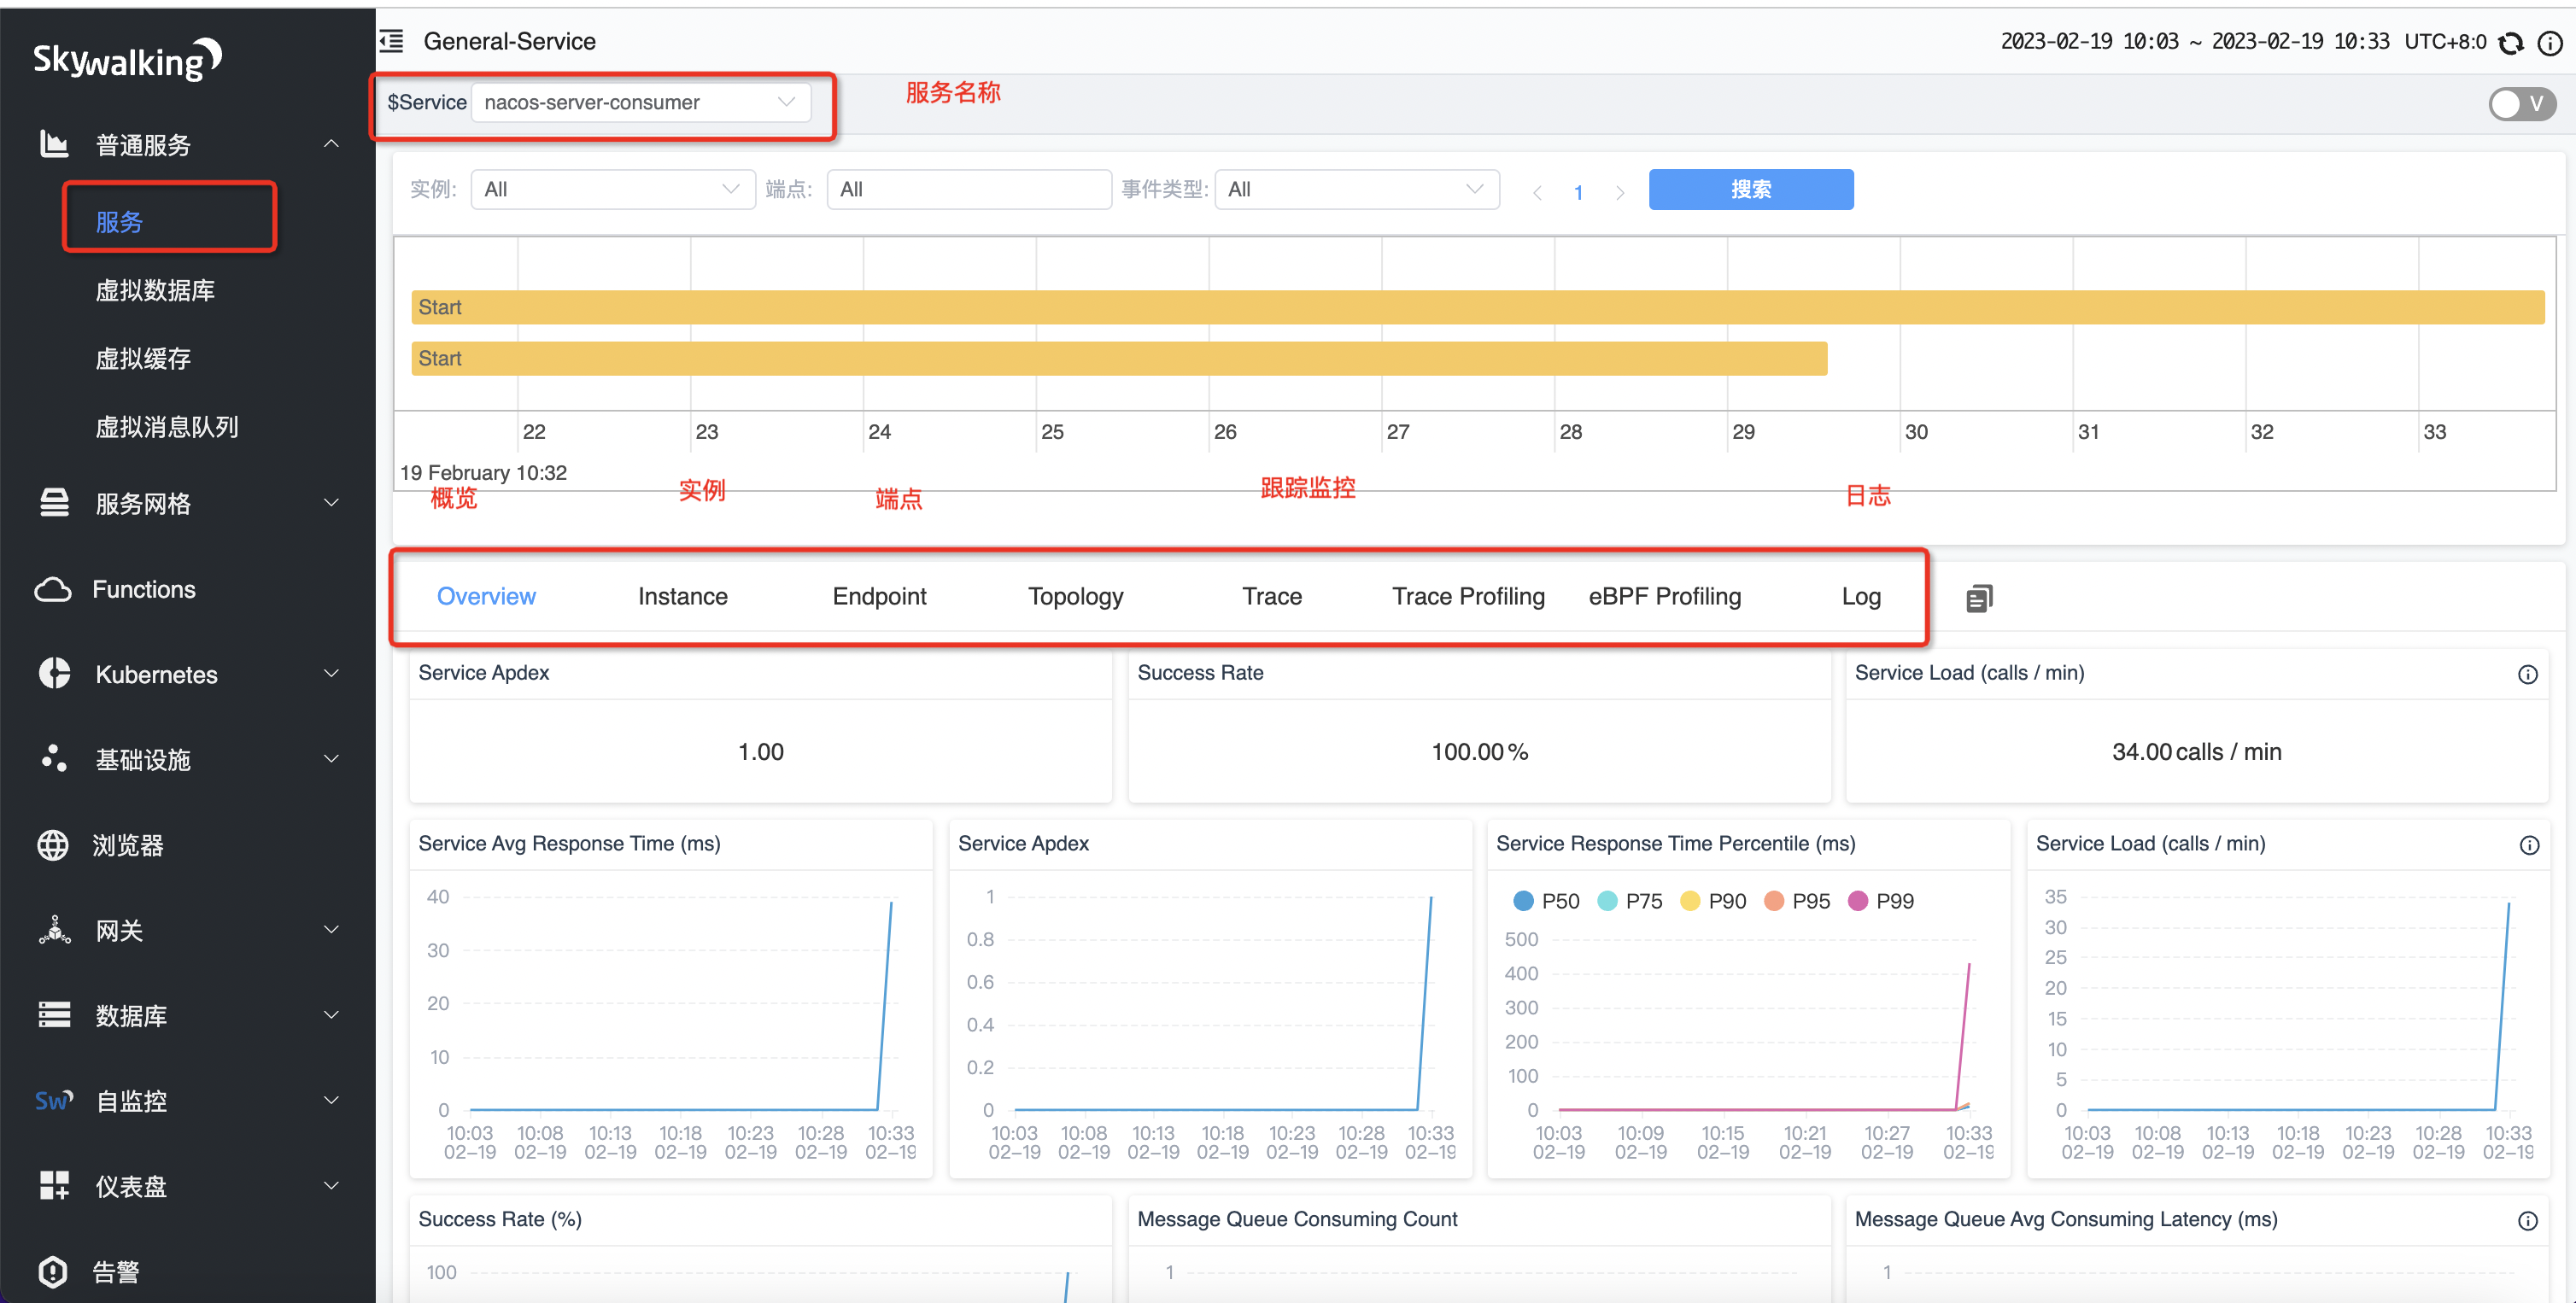
通过以下链接可以访问控制台
http://127.0.0.1:8080/
# 5.服务器启动

# 6.微服务监控
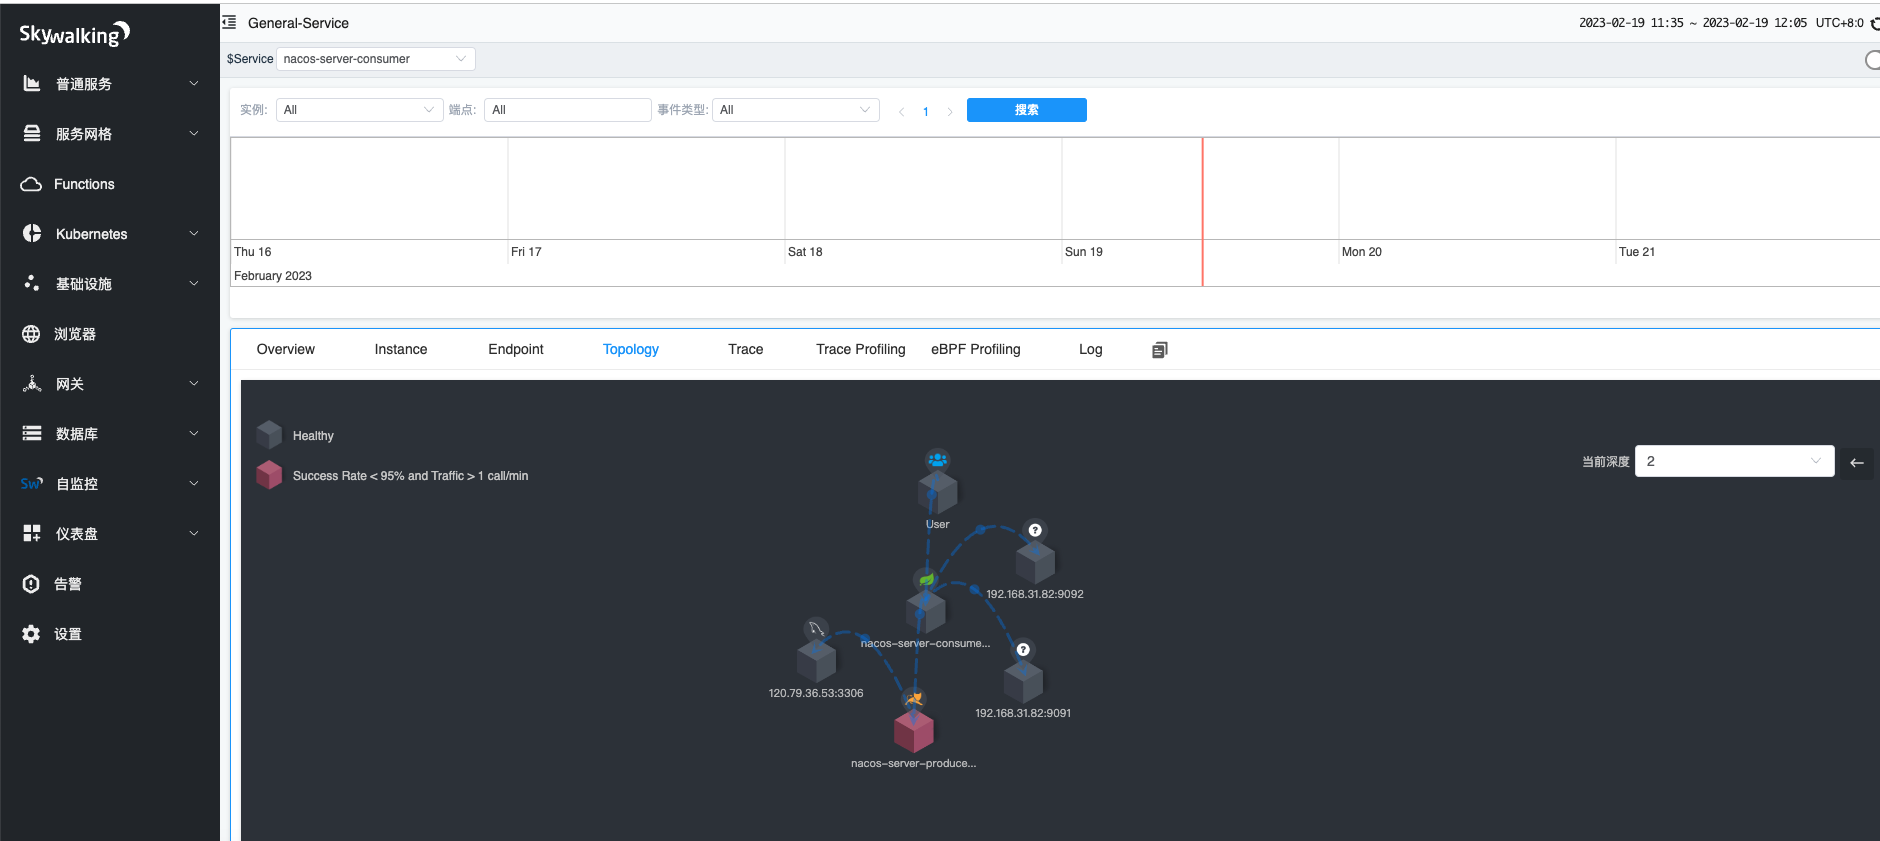
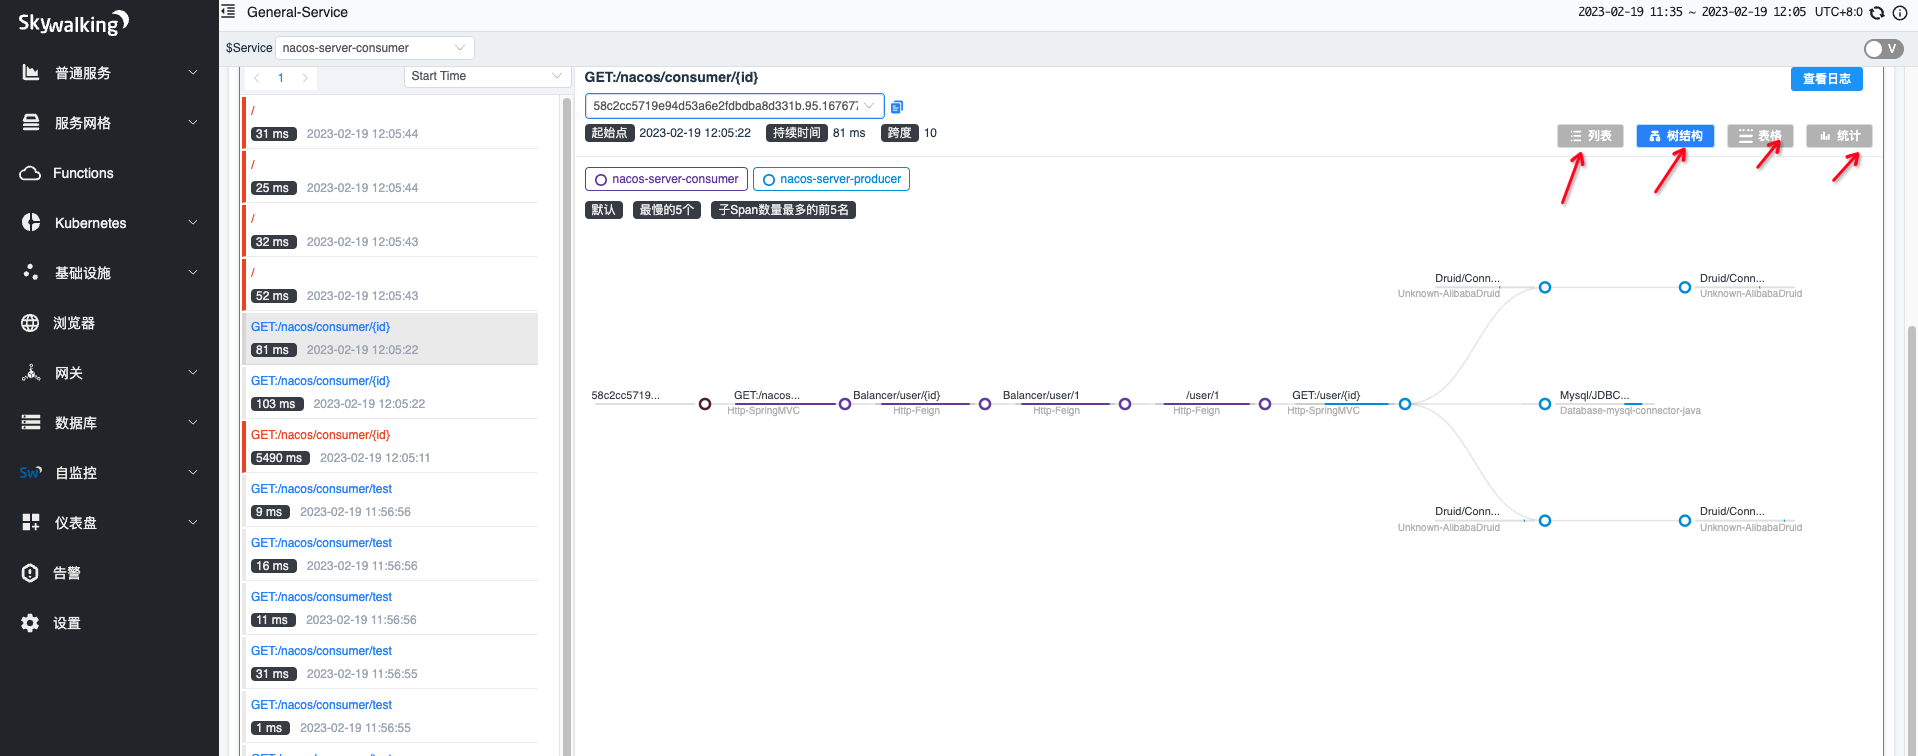
通过 consumer 负载均衡调用 producer,还可以看到查询了 mysql 数据库,数据监控一目了然
图形化展示
接口调用追踪
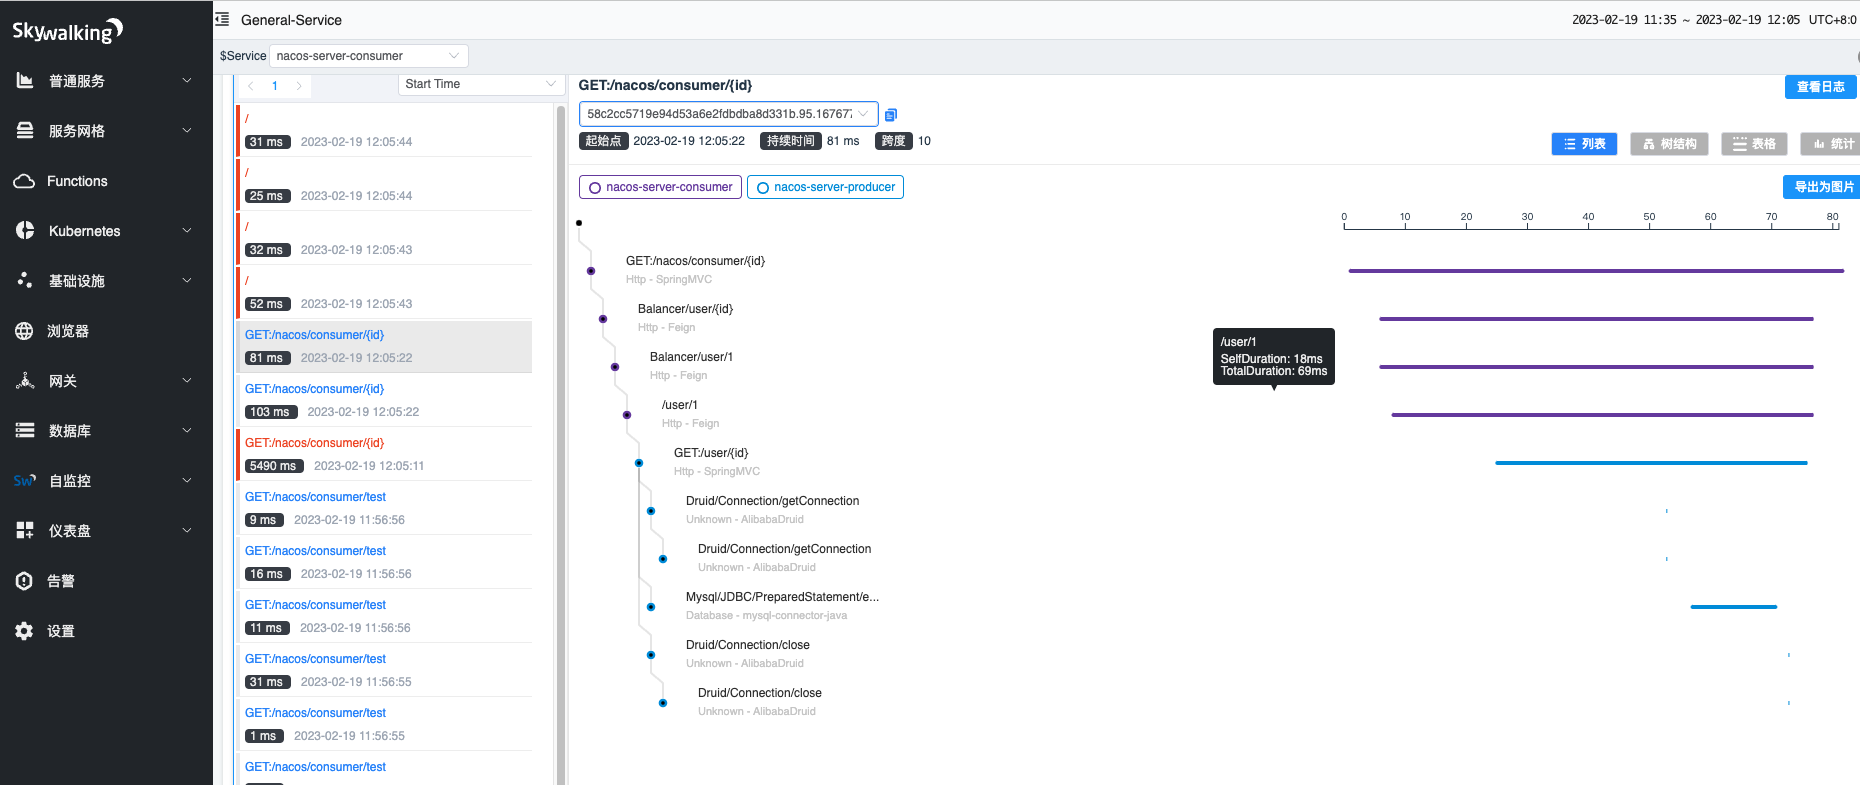
展示格式多样化
# 7.日志打印 TraceID
# 1.修改 pom
<dependency>
      <groupId>org.apache.skywalking</groupId>
      <artifactId>apm-toolkit-logback-1.x</artifactId>
      <version>8.7.0</version>
</dependency>
2
3
4
5
# 2.修改 logback
<appender name="FILE" class="ch.qos.logback.core.rolling.RollingFileAppender">
    <file>/apps/logs/app.log</file>
    <rollingPolicy class="ch.qos.logback.core.rolling.TimeBasedRollingPolicy">
        <fileNamePattern>/apps/logs/app-%d{yyyy-MM-dd}-%i.log</fileNamePattern>
        <MaxHistory>10</MaxHistory>
        <timeBasedFileNamingAndTriggeringPolicy class="ch.qos.logback.core.rolling.SizeAndTimeBasedFNATP">
            <maxFileSize>200MB</maxFileSize>
        </timeBasedFileNamingAndTriggeringPolicy>
    </rollingPolicy>
    <encoder class="ch.qos.logback.core.encoder.LayoutWrappingEncoder">
        <layout class="org.apache.skywalking.apm.toolkit.log.logback.v1.x.TraceIdPatternLogbackLayout">
            <!-- 日志格式中添加 %tid 即可输出 trace id -->
            <pattern>%d{yyyy-MM-dd HH:mm:ss.SSS} [%thread] %-5level %tid %logger{50} - %msg%n</pattern>
<!--                <pattern>%d{yyyy-MM-dd HH:mm:ss.SSS} %-5level %tid %t %logger{50}: %msg%n</pattern>-->
        </layout>
    </encoder>
</appender>
2
3
4
5
6
7
8
9
10
11
12
13
14
15
16
17
# 3.移动 agent 插件
将 agent 路径 activations/apm-toolkit-logback-1.x-activation-8.7.0.jar 移动到 plugins 中。
# 4.观察结果
2022-01-17 13:50:50.250 [http-nio-9013-exec-1] INFO TID:1baac609bcd549f9bde79acba8c1d34a.33.16423986502360001 o.a.c.core.ContainerBase.[Tomcat].[localhost].[/] - Initializing Spring DispatcherServlet 'dispatcherServlet' 2022-01-17 13:50:50.250 [http-nio-9013-exec-1] INFO TID:1baac609bcd549f9bde79acba8c1d34a.33.16423986502360001 org.springframework.web.servlet.DispatcherServlet - Initializing Servlet 'dispatcherServlet' 2022-01-17 13:50:50.263 [http-nio-9013-exec-1] INFO TID:1baac609bcd549f9bde79acba8c1d34a.33.16423986502360001 org.springframework.web.servlet.DispatcherServlet - Complete
# 8.警告回调
#webhooks:
#  - http://127.0.0.1/notify/
#  - http://127.0.0.1/go-wechat/
2
3
# 9.停止服务
jps
# 72844 OAPServerStartUp
# 72849 skywalking-webapp.jar
kill 72844 72849
2
3
4
# 五.seata
# 1.启动 TC server
下载 TC server 服务,进入 bin 目录,启动 TC server 服务,默认端口号是 7091
cd /Users/qinyingjie/Documents/software/seata/bin

# 2.yaml 配置
seata 相关的配置是大坑,很容易出问题
server:
  port: 8761
  servlet:
    encoding:
      force: true
      charset: UTF-8
      enabled: true

swagger:
  enable: true

#兼容swagger配置
spring:
  application:
    name: spring-boot-name
  #项目启动时创建数据表的 SQL 脚本,该脚本由 Spring Batch 提供
  #spring.datasource.schema=classpath:/org/springframework/batch/core/schema-mysql.sql
  # 在项目启动时执行建表 SQL
  batch:
    initialize-schema: always
    # 禁止 Spring Batch 自动执行,在 SpringBoot 中,默认情况,当项目启动时就会执行配置好的批理操作,添加了该配置后则不会自动执行,而需要用户手动触发执行
    job:
      enabled: false
  mail:
    host: smtp.qq.com
    # 发送者的邮箱账号
    username: 327782001@qq.com
    # 邮箱密码授权码
    password: kypxnmwfniqrcbeh
    properties:
      mail:
        smtp:
          auth: true
          starttls:
            enable: true
            required: true
  redis:
    database: 0 # Redis数据库索引(默认为0)
    host: 43.139.90.182 #Redis服务器地址
    port: 6379 # Redis服务器连接端口
    password: # Redis服务器连接密码(默认为空)
    jedis:
      pool:
        max-active: 200 # 连接池最大连接数(使用负值表示没有限制)
        max-idle: 10 # 连接池中的最大空闲连接
        min-idle: 0 # 连接池中的最小空闲连接
        max-wait: -1 # 连接池最大阻塞等待时间(使用负值表示没有限制)
  mvc:
    pathmatch:
      matching-strategy: ant_path_matcher
  # mysql
  datasource:
    dynamic:
      seata: true
      primary: kwan-ds
      datasource:
        kwan-ds:
          driver-class-name: com.mysql.cj.jdbc.Driver
          url: jdbc:mysql://localhost:3306/kwan?useSSL=false&useUnicode=true&characterEncoding=UTF-8&serverTimezone=Asia/Shanghai
          username: root
          password: 716288qwe
        ali-ds:
          driver-class-name: com.mysql.cj.jdbc.Driver
          url: jdbc:mysql://43.139.90.182:3306/kwan?useSSL=false&useUnicode=true&characterEncoding=UTF-8&serverTimezone=Asia/Shanghai
          username: root
          password: 15671628341Qwe.

seata:
  application-id: spring-boot-name
  tx-service-group: my-tx-group
  service:
    vgroup-mapping:
      my-tx-group: seata-server
    grouplist:
      seata-server: 127.0.0.1:8091
  enabled: true

#mybatis-plus配置
mybatis-plus:
  configuration:
    map-underscore-to-camel-case: true
    call-setters-on-nulls: true
    auto-mapping-behavior: full
    log-impl: org.apache.ibatis.logging.stdout.StdOutImpl
  mapper-locations: classpath*:mapper/**/*Mapper.xml
  global-config:
    banner: false
    # 逻辑删除配置
    db-config:
      id-type: AUTO
      logic-delete-field: delFlag
      logic-delete-value: 1
      logic-not-delete-value: 0
      table-underline: true

#logger配置
logging:
  config: classpath:logback-spring.xml
2
3
4
5
6
7
8
9
10
11
12
13
14
15
16
17
18
19
20
21
22
23
24
25
26
27
28
29
30
31
32
33
34
35
36
37
38
39
40
41
42
43
44
45
46
47
48
49
50
51
52
53
54
55
56
57
58
59
60
61
62
63
64
65
66
67
68
69
70
71
72
73
74
75
76
77
78
79
80
81
82
83
84
85
86
87
88
89
90
91
92
93
94
95
96
97
98
# 3.创建 UNDO_LOG 表
SEATA AT 模式需要 UNDO_LOG 表
-- 注意此处0.3.0+ 增加唯一索引 ux_undo_log
CREATE TABLE `undo_log` (
  `id` bigint(20) NOT NULL AUTO_INCREMENT,
  `branch_id` bigint(20) NOT NULL,
  `xid` varchar(100) NOT NULL,
  `context` varchar(128) NOT NULL,
  `rollback_info` longblob NOT NULL,
  `log_status` int(11) NOT NULL,
  `log_created` datetime NOT NULL,
  `log_modified` datetime NOT NULL,
  `ext` varchar(100) DEFAULT NULL,
  PRIMARY KEY (`id`),
  UNIQUE KEY `ux_undo_log` (`xid`,`branch_id`)
) ENGINE=InnoDB AUTO_INCREMENT=1 DEFAULT CHARSET=utf8;
2
3
4
5
6
7
8
9
10
11
12
13
14
# 4.@GlobalTransactional 注解
@Override
@GlobalTransactional
public Person savePerson(Person person) {
    personMapper.insert(person);
    User user = new User();
    user.setName(person.getUsername());
    user.setSex(person.getGender());
    feignUserService.save(user);
    return person;
}
2
3
4
5
6
7
8
9
10
# 5.undo_log 具体内容
{
  "undo_log": [
    {
      "id": 3,
      "branch_id": 4666091171524669445,
      "xid": "192.168.31.82:8091:4666091171524669444",
      "context": "serializer=jackson",
      "rollback_info": {
        "@class": "io.seata.rm.datasource.undo.BranchUndoLog",
        "xid": "192.168.31.82:8091:4666091171524669444",
        "branchId": 4666091171524669445,
        "sqlUndoLogs": [
          "java.util.ArrayList",
          [
            {
              "@class": "io.seata.rm.datasource.undo.SQLUndoLog",
              "sqlType": "INSERT",
              "tableName": "user",
              "beforeImage": {
                "@class": "io.seata.rm.datasource.sql.struct.TableRecords$EmptyTableRecords",
                "tableName": "user",
                "rows": ["java.util.ArrayList", []]
              },
              "afterImage": {
                "@class": "io.seata.rm.datasource.sql.struct.TableRecords",
                "tableName": "user",
                "rows": [
                  "java.util.ArrayList",
                  [
                    {
                      "@class": "io.seata.rm.datasource.sql.struct.Row",
                      "fields": [
                        "java.util.ArrayList",
                        [
                          {
                            "@class": "io.seata.rm.datasource.sql.struct.Field",
                            "name": "id",
                            "keyType": "PRIMARY_KEY",
                            "type": 4,
                            "value": ["java.lang.Long", 33]
                          },
                          {
                            "@class": "io.seata.rm.datasource.sql.struct.Field",
                            "name": "name",
                            "keyType": "NULL",
                            "type": 12,
                            "value": "秦梓淞"
                          },
                          {
                            "@class": "io.seata.rm.datasource.sql.struct.Field",
                            "name": "sex",
                            "keyType": "NULL",
                            "type": 1,
                            "value": "男"
                          }
                        ]
                      ]
                    }
                  ]
                ]
              }
            }
          ]
        ]
      },
      "log_status": 0,
      "log_created": "2023-02-19 20:43:24",
      "log_modified": "2023-02-19 20:43:24",
      "ext": null
    },
    {
      "id": 4,
      "branch_id": 4666091171524669446,
      "xid": "192.168.31.82:8091:4666091171524669444",
      "context": "serializer=jackson",
      "rollback_info": {
        "@class": "io.seata.rm.datasource.undo.BranchUndoLog",
        "xid": "192.168.31.82:8091:4666091171524669444",
        "branchId": 4666091171524669446,
        "sqlUndoLogs": [
          "java.util.ArrayList",
          [
            {
              "@class": "io.seata.rm.datasource.undo.SQLUndoLog",
              "sqlType": "INSERT",
              "tableName": "person",
              "beforeImage": {
                "@class": "io.seata.rm.datasource.sql.struct.TableRecords$EmptyTableRecords",
                "tableName": "person",
                "rows": ["java.util.ArrayList", []]
              },
              "afterImage": {
                "@class": "io.seata.rm.datasource.sql.struct.TableRecords",
                "tableName": "person",
                "rows": [
                  "java.util.ArrayList",
                  [
                    {
                      "@class": "io.seata.rm.datasource.sql.struct.Row",
                      "fields": [
                        "java.util.ArrayList",
                        [
                          {
                            "@class": "io.seata.rm.datasource.sql.struct.Field",
                            "name": "id",
                            "keyType": "PRIMARY_KEY",
                            "type": 4,
                            "value": ["java.lang.Long", 5]
                          },
                          {
                            "@class": "io.seata.rm.datasource.sql.struct.Field",
                            "name": "username",
                            "keyType": "NULL",
                            "type": 12,
                            "value": "秦梓淞"
                          },
                          {
                            "@class": "io.seata.rm.datasource.sql.struct.Field",
                            "name": "address",
                            "keyType": "NULL",
                            "type": 12,
                            "value": "当铺"
                          },
                          {
                            "@class": "io.seata.rm.datasource.sql.struct.Field",
                            "name": "gender",
                            "keyType": "NULL",
                            "type": 12,
                            "value": "男"
                          }
                        ]
                      ]
                    }
                  ]
                ]
              }
            }
          ]
        ]
      },
      "log_status": 0,
      "log_created": "2023-02-19 20:43:24",
      "log_modified": "2023-02-19 20:43:24",
      "ext": null
    }
  ]
}
2
3
4
5
6
7
8
9
10
11
12
13
14
15
16
17
18
19
20
21
22
23
24
25
26
27
28
29
30
31
32
33
34
35
36
37
38
39
40
41
42
43
44
45
46
47
48
49
50
51
52
53
54
55
56
57
58
59
60
61
62
63
64
65
66
67
68
69
70
71
72
73
74
75
76
77
78
79
80
81
82
83
84
85
86
87
88
89
90
91
92
93
94
95
96
97
98
99
100
101
102
103
104
105
106
107
108
109
110
111
112
113
114
115
116
117
118
119
120
121
122
123
124
125
126
127
128
129
130
131
132
133
134
135
136
137
138
139
140
141
142
143
144
145
146
147
# 六.常见问题
# 1.版本问题
openfeign:2.0.0.RELEASE spring-cloud-alibaba:2.2.2.RELEASE spring-boot:2.3.7.RELEASE
问题描述:
调用@FeignClient(“products”)注解下面的接口的时候报错。找不到这个类
java.lang.ClassNotFoundException: com.netflix.config.CachedDynamicIntProperty
解决方法,添加这个依赖
<dependency>
    <groupId>com.netflix.archaius</groupId>
    <artifactId>archaius-core</artifactId>
    <version>0.7.6</version>
    <exclusions>
        <exclusion>
            <groupId>com.google.guava</groupId>
            <artifactId>guava</artifactId>
        </exclusion>
    </exclusions>
</dependency>
2
3
4
5
6
7
8
9
10
11
官方推荐版本:
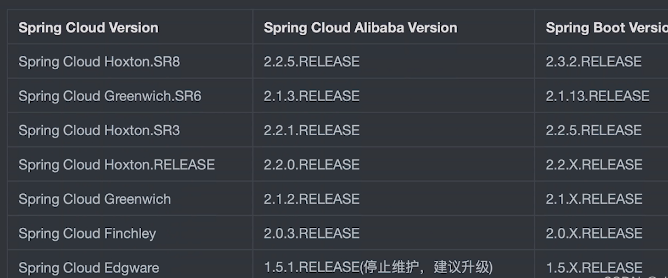
版本对应关系:Spring Cloud alibaba 版本对应
| Spring Cloud alibaba 版本 | Spring Cloud 版本 |
|---|---|
| Spring Cloud Alibaba2.1.0RELEASE | Spring Cloud Greenwich 版本 |
| Spring Cloud Alibaba2.2.0RELEASE | Spring Cloud Hoxton.RELEASE 版本 |
| Spring Cloud Alibaba2.2.1RELEASE | Spring Cloud Hoxton.SR3 版本 |
# 2.@PathVariable
@PathVariable 注解中的属性值 value 不能为空,我们只写@PathVariable,那 value 属性是默认为 null 的。所以需要将@PathVariable String name 改成 @PathVariable(value=”name”) String name。此外,这个问题不会在 Controller 类上出现,但会在 Feign 接口上出现。也就是通常加了**@FeignClient 注解的接口上**。
@PathVariable(value=”name”) String name
# 3.getForObject
@GetMapping(value = "/loadBalancerClient/{id}", produces = MediaType.APPLICATION_PROBLEM_JSON_VALUE)
  public Result loadBalancerClient(@PathVariable("id") Integer id) {
      ServiceInstance serviceInstance = loadBalancerClient.choose("nacos-server-producer");
      String url = String.format("http://%s:%s/user/%s", "nacos-server-producer", serviceInstance.getPort(), id);
      System.out.println("request url:" + url);
      return Result.ok(restTemplate.getForObject(url, Result.class));
  }
2
3
4
5
6
7
getForObject 第二个参数的含义是指返回值的类型.
# 4.sentinel 的实时监控无数据
主要是微服务和 sentinel 控制台之间网络不通,这个是最大可能的原因,可以查看 sentinel 控制台的日志文件,可以看出问题的原因.
解决的方案是:将微服务和 sentinel 控制台部署在同一台机器上,或者机器之间可以互相访问的服务器上
# 5.seata 的版本是大坑
单体应用
<parent>
    <groupId>org.springframework.boot</groupId>
    <artifactId>spring-boot-starter-parent</artifactId>
    <version>2.6.6</version>
    <relativePath/> <!-- lookup parent from repository -->
</parent>
<dependency>
    <groupId>io.seata</groupId>
    <artifactId>seata-spring-boot-starter</artifactId>
    <version>1.4.0</version>
</dependency>
2
3
4
5
6
7
8
9
10
11
微服务中的配置
<properties>
  <java.version>1.8</java.version>
  <project.build.sourceEncoding>UTF-8</project.build.sourceEncoding>
  <project.reporting.outputEncoding>UTF-8</project.reporting.outputEncoding>
  <spring-boot.version>2.3.7.RELEASE</spring-boot.version>
  <spring-cloud-alibaba.version>2.2.2.RELEASE</spring-cloud-alibaba.version>
</properties>

<dependency>
      <groupId>com.alibaba.cloud</groupId>
      <artifactId>spring-cloud-starter-alibaba-seata</artifactId>
</dependency>
2
3
4
5
6
7
8
9
10
11
12
