# 一.介绍
# 1.官网
# 2.什么是 element?
Element UI 是一个基于 Vue.js 的开源用户界面框架,用于构建 Web 应用程序的用户界面。它提供了一系列的可重用的 UI 组件,包括按钮、表单、对话框、菜单、表格、图表等,以帮助开发者更轻松地构建功能丰富的前端界面。Element UI 设计风格简洁美观,易于定制和使用,因此它在许多 Vue.js 项目中被广泛使用。
# 3.特点
Element UI 的特点包括:
- 丰富的 UI 组件:Element UI 提供了许多常见的 UI 组件,可以用于构建各种类型的 Web 应用程序。
- 响应式设计:组件能够根据不同的屏幕尺寸和设备自动适应,以确保用户在不同平台上都有良好的体验。
- 可定制性:开发者可以根据项目的需求对 Element UI 的组件进行自定义,包括颜色、样式和布局。
- 国际化支持:Element UI 提供了多语言支持,可以轻松实现国际化的 Web 应用。
- 活跃的社区和文档:Element UI 拥有庞大的用户社区和丰富的文档资源,开发者可以在社区中获得支持和分享经验。
Element UI 的主要目标是帮助开发者快速构建漂亮和功能强大的前端界面,特别适用于基于 Vue.js 的项目。如果您正在使用 Vue.js 来构建 Web 应用程序,Element UI 可能是一个有用的工具,可以加速开发过程并提升用户体验。
# 4.设计原则
一致性 Consistency:
- **与现实生活一致:**与现实生活的流程、逻辑保持一致,遵循用户习惯的语言和概念;
- **在界面中一致:**所有的元素和结构需保持一致,比如:设计样式、图标和文本、元素的位置等。
反馈 Feedback:
- **控制反馈:**通过界面样式和交互动效让用户可以清晰的感知自己的操作;
- **页面反馈:**操作后,通过页面元素的变化清晰地展现当前状态。
效率 Efficiency:
- **简化流程:**设计简洁直观的操作流程;
- **清晰明确:**语言表达清晰且表意明确,让用户快速理解进而作出决策;
- **帮助用户识别:**界面简单直白,让用户快速识别而非回忆,减少用户记忆负担。
可控 Controllability:
- **用户决策:**根据场景可给予用户操作建议或安全提示,但不能代替用户进行决策;
- **结果可控:**用户可以自由的进行操作,包括撤销、回退和终止当前操作等。
# 二.使用
# 1.安装
npm i element-ui -S
CDN:
<!-- 引入样式 -->
<link rel="stylesheet" href="https://unpkg.com/element-ui/lib/theme-chalk/index.css">
<!-- 引入组件库 -->
<script src="https://unpkg.com/element-ui/lib/index.js"></script>
2
3
4
# 2.完整引入
在 main.js 中写入以下内容:
import Vue from "vue";
import ElementUI from "element-ui";
import "element-ui/lib/theme-chalk/index.css";
import App from "./App.vue";

Vue.use(ElementUI);

new Vue({
  el: "#app",
  render: (h) => h(App),
});
2
3
4
5
6
7
8
9
10
11
以上代码便完成了 Element 的引入。需要注意的是,样式文件需要单独引入。
# 3.按需引入
借助 babel-plugin-component,我们可以只引入需要的组件,以达到减小项目体积的目的。
首先,安装 babel-plugin-component:
npm install babel-plugin-component -D
然后,将 .babelrc 修改为:
{
  "presets": [["es2015", { "modules": false }]],
  "plugins": [
    [
      "component",
      {
        "libraryName": "element-ui",
        "styleLibraryName": "theme-chalk"
      }
    ]
  ]
}
2
3
4
5
6
7
8
9
10
11
12
接下来,如果你只希望引入部分组件,比如 Button 和 Select,那么需要在 main.js 中写入以下内容:
import Vue from "vue";
import { Button, Select } from "element-ui";
import App from "./App.vue";

Vue.component(Button.name, Button);
Vue.component(Select.name, Select);
/* 或写为
 * Vue.use(Button)
 * Vue.use(Select)
 */

new Vue({
  el: "#app",
  render: (h) => h(App),
});
2
3
4
5
6
7
8
9
10
11
12
13
14
15
# 4.全局配置
在引入 Element 时,可以传入一个全局配置对象。该对象目前支持 size 与 zIndex 字段。size 用于改变组件的默认尺寸,zIndex 设置弹框的初始 z-index(默认值:2000)。按照引入 Element 的方式,具体操作如下:
完整引入 Element:
import Vue from "vue";
import Element from "element-ui";
Vue.use(Element, { size: "small", zIndex: 3000 });
2
3
按需引入 Element:
import Vue from "vue";
import { Button } from "element-ui";

Vue.prototype.$ELEMENT = { size: "small", zIndex: 3000 };
Vue.use(Button);
2
3
4
5
按照以上设置,项目中所有拥有 size 属性的组件的默认尺寸均为 'small',弹框的初始 z-index 为 3000。
# 5.修改字体大小
要增大 Element UI 中提供的刷新图标,可以在 i 标签中添加 font-size 样式来设置图标大小。例如,将 font-size 设置为 20px 可以将图标大小增大为原来的两倍: html <i class="el-icon-refresh" style="margin-right: 15px; font-size: 20px" @click="refreshPage"></i> 在上述代码中,将 font-size 设置为 20px 可以将刷新图标大小增大为原来的两倍。您可以根据实际需要调整 font-size 的值来设置图标大小。
# 6.刷新功能
要在 el-header 组件中添加一个刷新图标并实现刷新当前页面的功能,可以在 el-header 标签内添加一个 i 标签,并添加一个点击事件来实现刷新功能。具体步骤如下:
在模板中添加一个 i 标签,并添加一个点击事件。 在上述代码中,添加了一个名为 刷新 的 i 标签,并通过 @click 监听了该标签的点击事件,并调用了 refreshPage 方法。el-icon-refresh 是一个 Element UI 中提供的刷新图标。
<el-header style="text-align: right; font-size: 12px">
<el-dropdown><i class="el-icon-setting" style="margin-right: 15px"></i>
  <el-dropdown-menu slot="dropdown">
    <el-dropdown-item>新增</el-dropdown-item>
  </el-dropdown-menu>
</el-dropdown>
<span>kwan</span>
  <i class="el-icon-refresh" style="margin-left: 15px; cursor: pointer" @click="refreshPage">
  </i>
</el-header>
2
3
4
5
6
7
8
9
10
在 methods 中定义 refreshPage 方法,使用 location.reload() 方法来刷新当前页面。 在上述代码中,refreshPage 方法使用 location.reload() 方法来刷新当前页面。 这样,当用户点击 刷新 图标时,就会触发 refreshPage 方法,从而刷新当前页面。
methods: {
    refreshPage()
    {
        location.reload();
    }
}
2
3
4
5
6
# 7.跳转指定页面
跳转指定页面并添加合适的图标
<router-link to="/home/users">
  <el-menu-item index="/users" class="left-aside-item">
    <i class="el-icon-user"></i>
    <span slot="title">用户管理</span>
  </el-menu-item>
</router-link>
2
3
4
5
6
# 三.el-button
# 1.效果
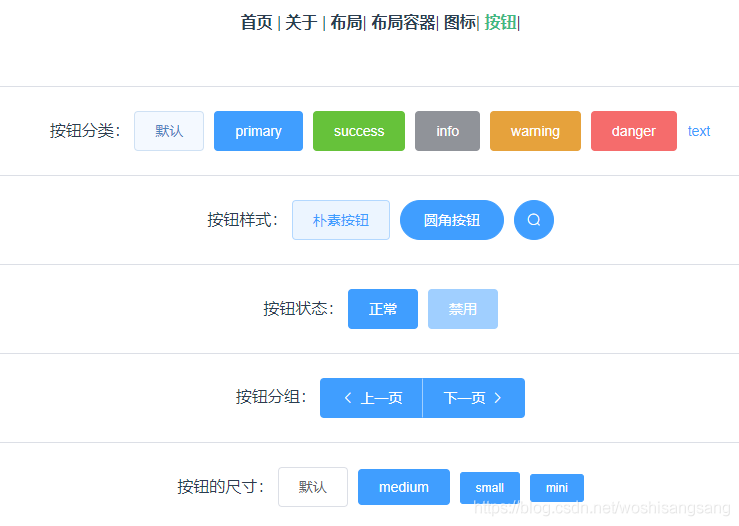
el-button 提供的功能已经比较完善了,拿来即可即可。注意不推荐自己定义 style 来修改默认样式,容易导致外观不统一。

# 2.按钮分类
el-button 按钮的分类基本是靠颜色区分的,另外还有一种文本按钮type="text",文本按钮由于比较小,比较适合用于表格每行的操作栏部分。
按钮分类:
<el-button>默认</el-button>
<el-button type="primary">primary</el-button>
<el-button type="success">success</el-button>
<el-button type="info">info</el-button>
<el-button type="warning">warning</el-button>
<el-button type="danger">danger</el-button>
<el-button type="text">text</el-button>
2
3
4
5
6
7
8
# 3.按钮样式
Element 提供了朴素按钮、圆角按钮、圆形按钮,需要注意的是圆形按钮一般只放一个图标进去,代码如下:
按钮样式:
<el-button type="primary" plain>朴素按钮</el-button>
<el-button type="primary" round>圆角按钮</el-button>
<el-button type="primary" circle icon="el-icon-search"></el-button>
2
3
4
# 4.按钮状态
按钮状态其实就是 HTML 标准的功能,通过 disabled 实现禁用即可。
按钮状态:
<el-button type="primary">正常</el-button>
<el-button type="primary" disabled>禁用</el-button>
2
3
# 5.按钮分组
按钮分组很好用,像常见的分页按钮,分成一组的话更加好看,通过<el-button-group>将按钮包裹起来,即可实现。
按钮分组:
<el-button-group>
  <el-button type="primary" icon="el-icon-arrow-left">上一页</el-button>
  <el-button type="primary">
    下一页
    <i class="el-icon-arrow-right el-icon--right"></i>
  </el-button>
</el-button-group>
2
3
4
5
6
7
8
# 6.按钮尺寸
饿了提供了默认、中、小、很小四种尺寸,代码如下:
按钮的尺寸:
<el-button>默认</el-button>
<el-button type="primary" size="medium">medium</el-button>
<el-button type="primary" size="small">small</el-button>
<el-button type="primary" size="mini">mini</el-button>
2
3
4
5
# 四.常用组件地址
# 1.布局容器
# 2.表格
# 3.input
# 4.图标
# 5.表单
# 6.日历
# 7.按钮
# 8.分页
# 9.加载
# 10.标签
# 五.常见问题
# 1.分页查询
<el-main>
  <el-table :data="userlist" v-loading="loading">
    <el-table-column prop="id" label="序号" width="50"></el-table-column>
    <el-table-column
      prop="question"
      label="问题"
      width="240"
    ></el-table-column>
    <el-table-column prop="response" label="答案"></el-table-column>
    <el-table-column label="创建时间" width="170">
      <template slot-scope="props">
        {{ props.row.createTime | dateFormat }}
      </template>
    </el-table-column>
    <el-table-column prop="详情" label="详情" width="100">
      <template slot-scope="props">
        <a href="#" @click.prevent="gotoDetail(props.row.id)">详情</a>
      </template>
    </el-table-column>
  </el-table>
  <el-pagination
    class="pagination"
    background
    :page-size="pageSize"
    :total="total"
    @current-change="handleCurrentChange"
  ></el-pagination>
</el-main>
2
3
4
5
6
7
8
9
10
11
12
13
14
15
16
17
18
19
20
21
22
23
24
25
26
27
28
<script>
import axios from "axios";
export default {
  name: "MyChat",

  data() {
    return {
      // 用户列表数据
      userlist: [],
      loading: false,
      currentPage: 1,
      pageSize: 5,
      total: 0,
    };
  },

  created() {
    // 调用请求数据的方法
    this.initCartList();
  },

  methods: {
    refreshPage() {
      location.reload();
    },
    gotoDetail(id) {
      this.$router.push("/home/chatinfo/" + id);
    },

    async initCartList() {
      this.loading = true;
      const { data: res } = await axios.get(
        "http://localhost:8888/chatbot/page",
        {
          params: {
            page: this.currentPage,
            pageSize: this.pageSize,
          },
        }
      );
      if (res.code === 200) {
        this.userlist = res.result.records;
        this.total = res.result.total;
      }
      this.loading = false;
    },

    handleCurrentChange(currentPage) {
      this.currentPage = currentPage;
      this.initCartList();
    },
  },
};
</script>
2
3
4
5
6
7
8
9
10
11
12
13
14
15
16
17
18
19
20
21
22
23
24
25
26
27
28
29
30
31
32
33
34
35
36
37
38
39
40
41
42
43
44
45
46
47
48
49
50
51
52
53
54
# 2.复制按钮
<div class="button-container">
  <el-button @click="copyCode">复制回答</el-button>
</div>

<script>
// 导入 axios 请求库
import axios from "axios";
import ClipboardJS from "clipboard";
export default {
  methods: {
    copyCode() {
      const codeBlock = document.getElementById("td-response");
      const range = document.createRange();
      range.selectNode(codeBlock);
      const selection = window.getSelection();
      selection.removeAllRanges();
      selection.addRange(range);
      document.execCommand("copy");
      selection.removeAllRanges();
      this.$message.success("代码已复制到剪贴板");
    },
  }
}
2
3
4
5
6
7
8
9
10
11
12
13
14
15
16
17
18
19
20
21
22
23
# 3.超过后省略
<el-table-column prop="response" label="答案" show-overflow-tooltip>
</el-table-column>
2
# 4.刷新当前页面
<i class="el-icon-refresh header-button-item" @click="refreshPage"></i>
refreshPage() {
	location.reload();
},
2
3
# 5.跳转
// 新页面打开
window.open('https://www.qinyingjie.top/')

// 当前页面打开
window.location.href = "https://www.qinyingjie.top/";
2
3
4
5
# 6.头部 2 个按钮
<el-row>
  <el-col :inline="true" :span="24">
    <el-button class="el-button-header" type="success" round @click="myHome">
    	 我的主页
    </el-button>
    <el-button class="el-button-header" type="primary" round @click="logout">
   		 退出登录
    </el-button>
  </el-col>
</el-row>
2
3
4
5
6
7
8
9
10
# 7.键盘点击事件
<el-input
  clearable
  v-model="formInline.question"
  placeholder="请输入问题"
  @keydown.enter.native="initCartList"
>
</el-input>
2
3
4
5
6
7
02-Vant →
